
Mysterious Treasure
You have reached level 33, and there are two short term choices in front of you…
You can keep going, fuel your main squad and upgrade your overseer’s office. This will, however, keep you at a disadvantage - you’ll have lower access to free materials and resources for upgrading. You could also stand your ground, focus on the Mysterious Treasure - this will, however, slow down your progress momentarily - as you’ll be spending lots of resources for non-main characters
Remember the essential resources? Food, water, caps, and materials? Well, you’re going to have to decide on whom you’re going to spend them on. You see, unlike any other incidents so far, Mysterious treasure requires you to use bonded dwellers. That’s… bad.
Why is it bad? Well, do you have a fully equipped squad of each of the factions? Probably not. That’d be like 25 level-55 or higher dwellers. And while we’re reading the bad news, let’s add that you need Mysterious Treasure to meaningfully improve the gear of your dwellers without paying money. That’s right.
Mysterious Treasure is the Place Where You Obtain Attachment Kits and Enclave Kits…
… and as I’ve said in the previous post, you need those for attachment remaking. That’s an improvement of an attachment past level 60. To not make it easy on you, Mysterious Treasure further graciously allows you to build and upgrade buildings within the secret base at a favorable price of hundreds of thousands of power + some resources gained, you guessed it, from the Mysterious Treasure missions.
Is It Worth It?
That’d be a resounding yes. By completing incidents within the Mysterious Treasure, you’ll unlock repeatable missions that cost you nothing (only two clicks a day) and reward you with sugar bombs, that’s the currency of this location.
There are two types of stores - the kind that’s always available and the one that shows up once you collect a lot of sugar bombs (for a few hours or so).
The first ones’ main stock are attachment kits, upgrade materials kits (the items that net you 10 of each material for a level, 4 levels to choose from), adaptability chips, and such. There’s a section for each of the factions/bonds, which accepts only the sugar bombs gained from that particular faction’s location. They also sell 2-hour resource packs, which are incredibly not worth it unless you have extra resources. But at that point. Just upgrade the building that increases stock and buy that instead. More about that later.
The short-term shop allows you to mainly exchange attachment kits for enclave kits.
Now, the Good News
Fortunately for us, each incident only needs to be unlocked once. That means we can be flexible in the attachment department. Grab a set of fully upgraded gear from your main squad, upgrade the best 5 dwellers of a particular faction as high as possible but as low as affordable. A good squad goal to aim for is:
- perks level 25 (roughly 333k water),
- level up to 40 - 50
- gear to whatever you can afford - make sure to scout large battle locations for lots of low lower resources instead of wasting Rad-X for sweeping them, sweep only high-level locations or poster locations. From my experience, 25 - 39 is very affordable.
Be smart. You do not need 10 sets of fully upgraded SSR gear. You only need 5 pieces, unless you’re going for specific ones for specific dwellers. Take the Mysterious Treasure, for example. You’ll have to complete locations with dwellers of one faction. Not all your dwellers will be maxed out, so… just unequip the gear from your main squad. Then, pop them onto those unlucky guys from the institute, and return the equipment to the rightful owners later. There, 5400 superb materials were saved, and 5 dwellers still got to use maxed-out SSR attachments.1
Now, your dwellers have a few thousand of power on their own… now slap your main squad’s attachments on them. Yeah, you’ve just boosted them with a lot of power and probably some set bonuses… now go clear those incidents!
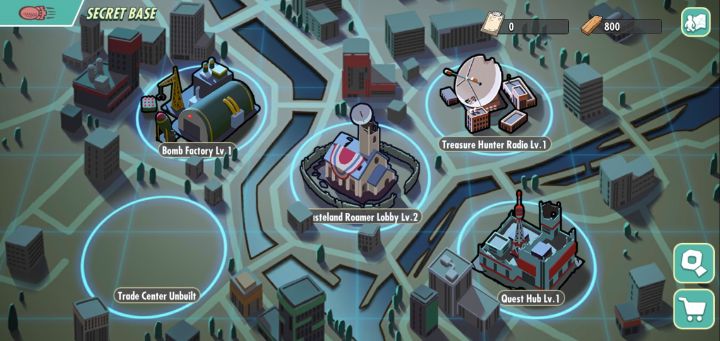
What About the Secret Base? What do I do with that?
Expand it, at least a bit.
- The middle building is sort of an overseers office. It only allows you to improve other buildings to a higher level. Get it to level 2 for now.
- The top right building allows you to expand faction maps. Expand only the factions you’re confident you can boost enough that they can beat 150k or so power encounter. Get it to level 1 or 2 if you can get a strong enough squad together.
- Bottom left building adds extra items to the store. Not worth the hundreds of thousands of power until you have lots spare.
- Bottom right unlocks quests. If you have strong dweller groups, go for it. Extra resources are always lovely. Unlock at least level 1.
- Top left grants a little bonus from hunting (those unlockable repeatable clicks). Ignore that one; unless you need to upgrade the middle one, it’s just a 2% increase.
There’s not much else to say about the Mysterious Treasure, other than that it sometimes appears in events… such as the Celebration Challenge Event festival. That required you to “Obtain at least 1 Treasure from a treasure spot in Mystic Treasure”, in exchange you got 2 silver tokens, so yeah…
Enjoy the upgrading! And remember, you can reset characters without a rare memory chip (50 Nuka Cola Quantum once a week or 500 anytime) only until they reach level 20 (perks, tools, and attachments don’t count, the only level does). So that means if you’re planning to grab your resources back, don’t go higher.
-
Toms, M. (2021, August 14). Attachments and Remaking. Toms.Click. https://www.toms.click/gaming/fallout-shelter-online/2021/08/13/attachments.html ↩